
Summary
The menu item ‘Setup in CE Admin App has three sub-menu (Figure 4.1):
- Style
- Messaging
- Settings
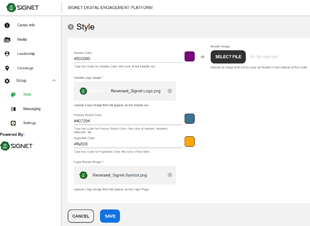
The ‘Style’ sub-menu item opens a page(Figure 4.2) where the admin can provide different colors that will be used for different components in CE Client App. ‘Header color’ field will be used as a background color for the header row in Client App. Text color of the header row is always white. The admin can type for this field some hex-color code, for example, #800080 or select and upload some image(‘Select File’ button) that will populate the header row as a mosaic. If the admin provides both a hex code and an image, the image will be used as a background color for the header row.
‘Header Logo image’ will allow the admin to provide some logo for the header row. This image will be centered in the header row.
‘Primary Brand Color’ will be used in CE Client App for many elements: color of icons of the active tabs in the navigation pane, color of selection in feedback evaluation forms, color of ‘Briefing details’ header on the ‘Briefing’ tab, color of nodes in the ‘Agenda’ tab, color of the ‘+ Cart’ buttons on the ‘Media’ page, color of selected elements in Email cart on the ‘Media’ page, color of Topics on the ‘Agenda Topics’ tab, color of ‘Header’ elements on the Feedback/Briefing tab, color of the ‘Send’ button.
‘Hyperlink color’ will be used in CE Client App for all hyperlinks, address and phone number fields, ‘Email’ and ‘Download’ icons, the ‘View Bio’ button, selected/active thumbnail, ‘left/right’ arrows in all carousels.
‘Login Screen Image’ allows uploading some image that will be used as a Login image on the Login screen.
Some fields are mandatory, some – optional. If the admin leaves optional fields empty, the system will be used the next default colors: black color as ‘Primary Brand Color’, #0a57e5 as 'Hyperlink Color'.
All styles provided on the page will be applied to all centers.

|
Figure 4.1 - Setup menu item |
|
Figure 4.2 - Style page |