
Overview & Objectives
A new entity, “Contact,” will combine all external and internal attendees and make the briefing creation process more accessible.
Instead of creating attendees every time from scratch during briefing creation, users will be able to choose an attendee from the Contact list easily.
Moreover, having an attendee as a Contact will allow for tracking their analytics, feedback, ratings, etc.
Now the User chooses Attendee from the list of Contacts. All Attendees are Contacts, but not all of the Contacts are Attendees. The User cannot override the Contact’s data on the engagement level. When the Attendees' data is changed – it affects the Contact record, which means this data will be updated everywhere the Contacts participated.
Engagement Details – Single Attendee
Assign existing contact
The User can add Attendee from the existing Contact list in the system on the Briefing Details – Attendees - Add Attendee page. The User can quickly type the Contact's first or last name, and the matching options will be shown in the lookup.
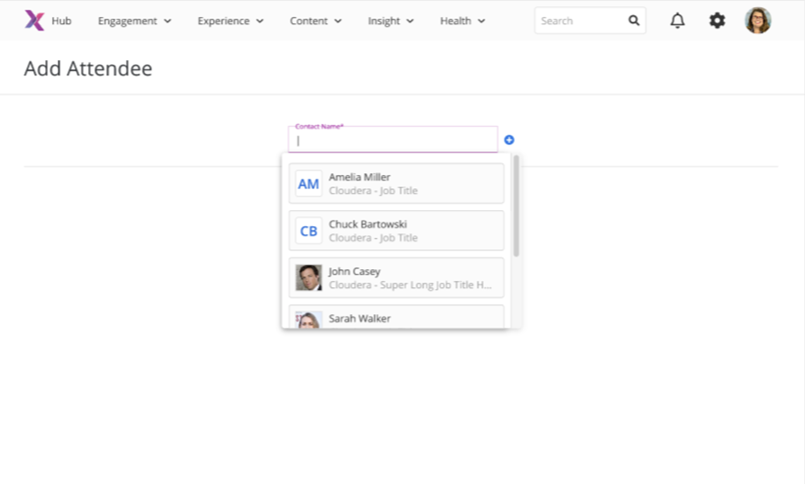 Figure 1. Add Attendee - Contact's lookup
After the User selects a needed Contact - The Contact's card will be added. More than one Contact can be added to this page. After assigning all necessary Contacts on the page, the User clicks the "Save" button and navigates back to the Attendees' main page. All selected Contacts are added as Attendees to the engagement.
Figure 2. Add Attendee - Added Contacts
Note: all existing Attendees were created as Contacts in the system. Since the account is the required Contact field, the two system account types are created.
The tenant account – internal company account for the internal Contacts.
The unknown account is assigned to all Contacts we need help identifying accounts for.
Create new contact
The User can also create a new Contact on the Attendees - Add Attendee page. The “Add Contact” modal window will open after clicking the “+” icon next to the Contact Name field.
Figure 3. Add Attendee - Create New Contact
After saving the form, new Contacts will be created in the system. The User cannot create a contact or an email already existing in the system.
|
Fields |
Description |
|
Type* |
· required · drop-down · only a single selection is available · External · Internal |
|
First Name* |
· required · freeform text field · Leading whitespaces are not allowed. · do not accept special symbols (!@$^&&*) · max length: 50 symbols |
|
Last Name* |
· required · freeform text field · Leading whitespaces are not allowed. · do not accept special symbols (!@$^&&*) · max length: 50 symbols |
|
|
· text field · Leading whitespaces are not allowed. · email structure <firstName@tenant.com> · max length: 100 symbols For “Type” = External: · optional For “Type” = Internal : · required |
|
Account* |
· required · only a single selection is available · type-ahead search o the list of all accounts created in the Hub o sorted by account name o not case sensitive o search by account name · Account Name / Account industry |
|
Photo |
· optional · upload button · supported files: PNG, JPG, JPEG · max size: 20 Mb · helper text “Optimal media size is 500px wide or 500px tall.” |
|
Title |
· optional · freeform text field · Leading whitespaces are not allowed. · do not accept special symbols (!@$^&&*) · max length: 250 symbols |
|
Notes |
· optional · WYSIWYG · max length: 2500 symbols |
Edit contact
The User can update attendees/contact info on the engagement level to ensure the data is up-to-date.
When the Attendee is assigned to the engagement, the User can click on their name and update data on the “Edit Contact” page. All fields are editable, including “Type.”
After saving the change, the Contact record is updated for all engagements the Contacts participated in.
Note: the type change will affect analytics submitted by this Contact before the change. Analytics can be revealed or hidden depending on where this data is shown.
Figure 4. Attendees - Edi Attendee
Remove contact
The User can remove attendees added to the engagement if this person will not attend a briefing or if they were added by mistake.
The User can open the “Edit Contact” page and remove the Attendee from this page. If the Attendee that should be removed has already received a briefing invitation - a cancellation email will be sent.
BM & Engagement Creator
The briefing manager and the engagement creator are no longer auto-created as internal attendees. The CP link for these roles is removed from the Overview – Launch section.
Delete the Account assigned to a Contact.
The account assigned to the Contact and the active* engagement cannot be deleted from the Hub.
*Active: confirmed, new request, pending
Figure 5. Delete account warning
Engagement Details – Multi Attendees
Assign existing contact
The Users can add Attendees by manually entering them on the “Add Multiple Attendees” form or copying data from the xlsx.
Figure 6. Add Multiple Attendees
The email is the unique Contact identificatory in the system. If the User pastes the email that already exists in the system and then changes one of the other fields, e.g., Account, then the Contact’s Account will be updated after saving the form.
|
Fields |
Description |
|
Type* |
· required · drop-down · Customer is selected by default · only a single selection is available · External · Internal |
|
First Name* |
· required · freeform text field · Leading whitespaces are not allowed. · do not accept special symbols (!@$^&&*) · max length: 50 symbols |
|
Last Name* |
· required · freeform text field · Leading whitespaces are not allowed. · do not accept special symbols (!@$^&&*) · max length: 50 symbols |
|
|
· text field · Leading whitespaces are not allowed. · email structure <firstName@tenant.com> · max length: 100 symbols For “Type” = External: · optional For “Type” = Internal : · required |
|
Account* |
· required · only a single selection is available · type-ahead search · the list of all accounts created in the Hub · sorted by account name · not case sensitive · search by account name · search starts to work after entering the first character · “Add account” button |
|
Title |
· optional · freeform text field · Leading whitespaces are not allowed. · do not accept special symbols (!@$^&&*) · max length: 250 symbols |
There are a few exceptions the User cannot do on this form.
|
Scenario |
Expected behavior |
Mockup |
|
Two identical emails are added to the form |
Both fields are highlighted. |
|
|
- paste not existing type (VP manager) - paste not existing account |
The field is highlighted. |
Create new contact
The User can create new Contacts on this form as well. If the User enters an email that does not already exist in the system – the new Contact will be created.
Contacts without entered email will also be created as new in the system each time the User saves the form.
Engagement - Requests
Assign existing contact & create new ones.
From now on, the Attendees can be chosen from the list of existing Contacts for the Requests with the source “Nexus Hub.”
The User can quickly type the Contact's first or last name, and the matching options will be shown in the lookup.
The new Contact can be created on this page as well.
Figure 7. Request Details - Add Attendee (Hub)
Convert the request to the engagement.
The Contacts on the Request Details page will be automatically added as Attendees when the Request is converted to an engagement.
Program Site & CRM request form
Add Attendee
The previous attendee’s flow is kept for the request submitted in the Dynamics and Programs Site.
The Users need to enter Attendee’s data manually on the Request Form.
Figure 8. Request Details - Add Attendee (PS, Dynamics)
Convert the request to the engagement.
Attendees added to the Dynamics or Programs Site request will not be created as Attendees after the request is converted to the engagement.
Customer Portal – General Access link – Existing Attendee
Attendees without an email
All User must enter their email to log in to the Customer Portal via the general access link. Since email is a unique Contact identifier, the User should enter an email that has yet to exist in the system.
After entering an email – the User navigates directly to the Customer Portal.
Figure 9. General access link - Add email
However, the scenario when the User enters an email already assigned to another Contact may occur.
Figure 10. General access link - The email already exists
If the User does not want to log in to Portal as suggested person and clicks “No,” – they stay on the current page and need either to contact the Briefing Manager or to choose another available action.
If the User does want to log in to the Portal as suggested person and clicks “Yes,” – they navigate directly to the Customer Portal as the person mentioned in the warning pop-up.
Attendee with email
For attendees who already have email entered in the Hub, the step to confirm an email is removed from the general access link login.
Now the User with an email clicks on their name and navigates directly to the Customer Portal.
Customer Portal – General Access link – New Attendee
The attendees added via the “Add me to the briefing” flow will be created as a Contact in the system. For this purpose, the new “Account” field is added.
The Attendee needs to choose one of the suggested accounts:
- all accounts assigned to the engagement
- Tenant account
- Other accounts
The Contact type will be determined based on the account type selected.
- For account type = Partner or Customer: contact type = external
- For account type = Internal: contact type = internal
|
Fields |
Description |
|
Account |
· required · only a single selection is available · drop-down with the list of accounts assigned to the engagement + “Other” and “Tenant” accounts · Other = Unknown. · Accounts sorted alphabetically |
Figure 11. General access link - Add New Attendee
Suppose the User enters an already existing email in the system and overrides any fields (first, last name, or account). In that case, the User navigates to the Portal, and the Contact’s data will be updated.
[CP]: Pin access flow - Redirect to the general log-in screen
Pin Access flow: https://signet.hub.nexuscenter.io/ceapp/login
The Pin Access flow is also updated. Now the User should enter a valid meeting id, then the correct PIN for this engagement, and then navigate to the general login screen.
Customer Portal – General Access link – Notifications
Existing Attendee adds an email.
When the existing Attendee adds an email to the Customer Portal – the Briefing manager of this engagement receives a notification via email regarding this change.
The Briefing Manager can either accept this change (no extra action is needed) or revoke access from the specific Attendee.
If the Briefing Manager revokes an Attendee’s access, the following actions are done:
- the Attendee is removed from the engagement
- the Contact the Attendee is associated with is not deleted from the Hub
- the Contact is added to the blacklist of the Customer Portal
- the Contact cannot log in to any other engagements of the Customer Portal
New Attendee is added to the Portal.
When the new Attendee adds themself to the Customer Portal – the Briefing manager of this engagement receives a notification via email regarding this change.
The Briefing Manager can either accept this change (no extra action is needed) or revoke access from the specific Attendee.
If the Briefing Manager revokes an Attendee’s access, the following actions are done:
- the Attendee is removed from the engagement
- the Contact the Attendee is associated with is not deleted from the Hub
- the Contact is added to the blacklist of the Customer Portal
- the Contact cannot log in to any other engagements of the Customer Portal
Note: for now, there is no way to unblock the attendees from the blacklist. The BM can still add a Contact to the engagements, but the Attendee needs help accessing Customer Portal.
Analytics & feedback submitted by revoked Attendee is kept (planned for future versions).